
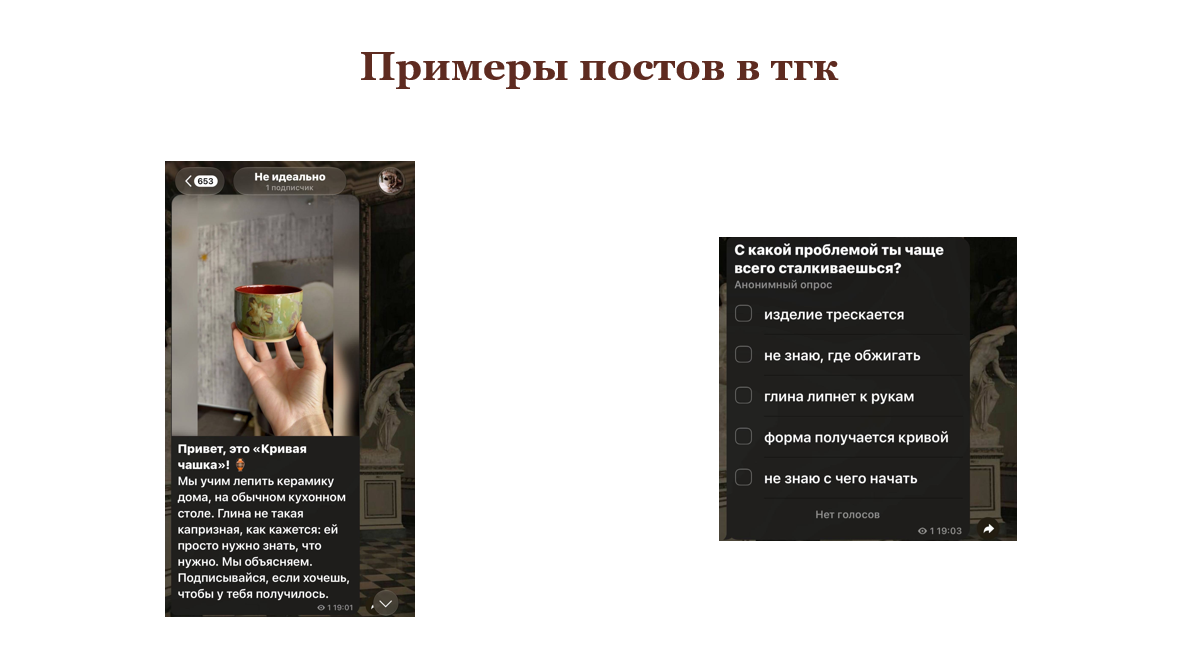
Zen: Article 1
Title: Where to Start Making Pottery at Home: The First 14 Days
Day 1. Decide what you want to sculpt. For your first project, choose something simple—a small cup or a bowl without a handle. Handles, spouts, and lids will add complexity, so leave those for later. Next, decide on your clay. If you want a decorative piece but aren’t ready to find a kiln, self-hardening clay will work. If you dream of drinking from your own cup, you will need ceramic clay and firing in a studio that accepts outside pieces. Therefore, before purchasing, find out the temperature at which they fire.
Day 2. Prepare your space and tools. You will need a piece of cloth or board, a container of water, a sponge, a stick (a wooden skewer will do), and plastic wrap. Before starting, knead the clay thoroughly by hand for a minute or two: this will remove air bubbles and make it uniform.
Day 3. Sculpting the cup from a lump. Take a ball of clay the size of a tangerine. Using your thumb, make an indentation in it without piercing the bottom completely—leave about one centimeter. Then, turning the ball in your palm, gradually thin the walls: press from the inside and the outside with your fingers. Try to keep the thickness even, about 5–7 mm. Smooth the rim and the bottom with a damp sponge. Smooth any small cracks with a fingertip dipped in water.
Days 4–7. Drying slowly. Cover the cup loosely with plastic wrap or cloth and place it in a draft-free area, away from the radiator. Open and check it once a day. Drying too fast is the main cause of cracks. When the clay becomes leather-hard (it lightens, stops feeling tacky, but is still slightly pliable), you can refine the shape or apply a pattern. Exact timelines depend on the thickness of the item and how dry and warm the room is, so rely on its appearance, not the calendar.
Days 8–14. Waiting for complete dryness. Completely dry clay is lighter and feels light to the touch, not cold in your hand. In this state, the piece is very fragile—hold it with both hands. If you used self-hardening clay, you can now sand it with fine-grit sandpaper and paint it. If you used ceramic clay, take the cup to a studio for firing.
When to sound the alarm. If a crack appears on a wet piece, do not panic. A small one can be filled with slip (this is clay mixed with water until it has the consistency of sour cream). If the piece has already dried and cracked significantly, it is simpler to sculpt a new one—the experience will stay with you. In summary, the first cup might come out crooked, and that’s perfectly normal. In two weeks, you will have a finished piece and an understanding of how the clay behaves. For more tips, SOS cards, and the «First Cup Journal, ” look in our Telegram channel, „The Crooked Cup.“
Zen: Article 2
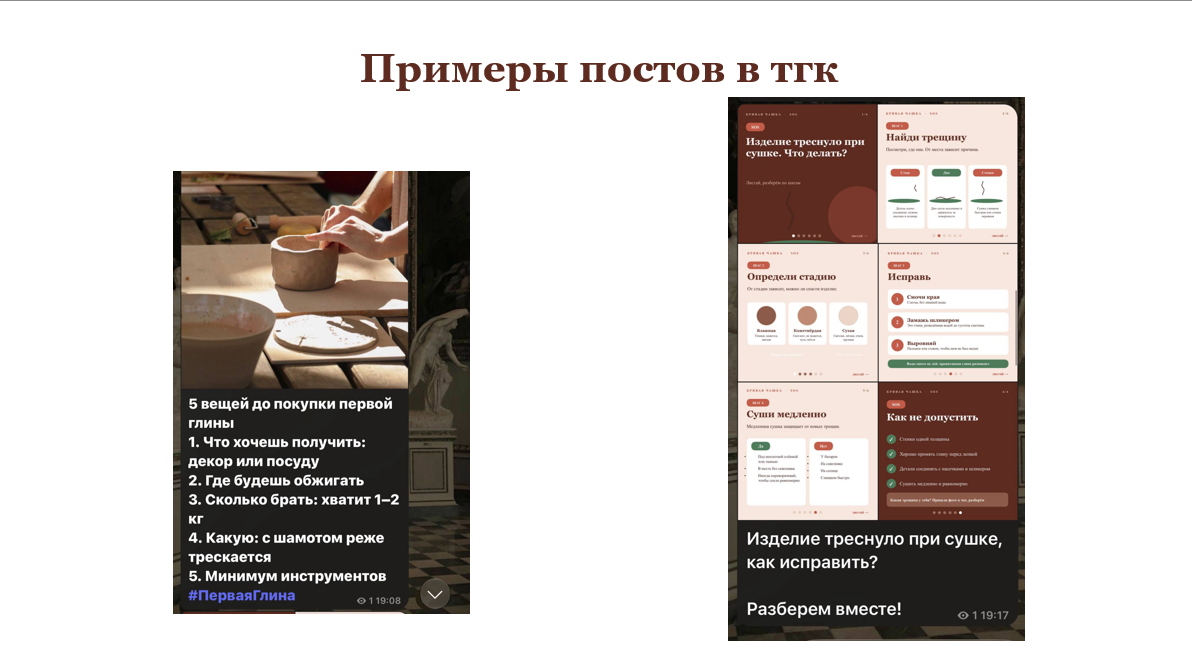
Title: Cracks During Drying: 5 Causes and How to Prevent Them
Introduction. You molded a cup, and a couple of days later, you find a crack in it.
It’s frustrating, but this happens to almost every beginner, and cracks have understandable causes. We’ll explore the five main ones.
Cause 1. Drying too quickly. Edges and thin spots dry faster than the center. Clay shrinks as it dries (this is called shrinkage), and if one area «compresses» before another, tension develops between them, leading to a crack. What to do: cover the piece loosely with plastic wrap or cloth, move it away from radiators and drafts, and dry it slowly.
Cause 2. Uneven wall thickness. A thick section dries slower than a thin one, and cracks appear at the joint. What to do: try to keep the wall thickness uniform. Any sudden transition from thin to thick should be smoothed out.
Cause 3. Air bubbles in the clay. If the clay is not wedged thoroughly, voids remain inside. These weaken the piece and can cause cracks during drying or severe damage during firing. What to do: before sculpting, thoroughly wedge the clay by kneading and folding it by hand until it is uniform.
Cause 4. Poorly joined parts. A handle, a foot, or another attached piece that was merely stuck on will detach from the main body as it dries. What to do: score both surfaces with a tool (these are small scratches), dampen them with slip, press them firmly together, and smooth the seam.
Cause 5. The base dries slower and adheres to the surface. The walls have already dried, but the base is still damp and stuck to the paper or table. This creates tension, and the base cracks. What to do: set the piece on a board or cloth, and once it has partially dried, flip it over and allow the base to dry.
How to fix an already appeared crack. While the clay is still damp, lightly wet the edges of the crack, fill it with slip, and gently level it. Continue drying slowly. If the crack is through the entire piece or the item has already dried, don’t hope it will seal itself—it’s better to remake it.
Conclusion. Cracks can almost always be prevented: dry slowly, sculpt evenly, wedge the clay thoroughly, and join parts correctly. If you are unsure what happened to your work, send a photo to our Telegram channel, «Crooked Cup, ” and we will help you figure it out.
Telegram: Post
Title: Myth or Truth? Do you need a potter’s wheel for your first project?
MYTH. The wheel looks like the ultimate symbol of ceramics, but it isn’t necessary to start. Working on a wheel (for example, centering clay) is a separate skill, and it’s easier to learn once your hands are already familiar with clay. What to do instead of the wheel:
- Pinching method (sculpting from a solid lump): Take a ball of clay, press an indentation with your thumb, and then thin the walls with your fingers. This creates bowls and small cups.
- Coiling method: Roll out «sausages,» lay them in a circle one on top of the other, and smooth the seams. This is how vases and pots are made.
- Slab method: Roll out the clay with a rolling pin and assemble pieces into plates, boxes, and risers. For this, you only need a table, your hands, and a couple of simple tools. You can get to the wheel later—during a trial studio session, once you understand that you enjoy the craft. Where did you start? Write in the comments.
Zen and TGK: Diary
Title: My First Cup Diary, Week 1My First Cup Diary. Week 1: I brought in the clay
Day 1. I bought 1 kg of ceramic clay with chamotte. I called the studio in advance
to find out what firing temperature they use so the clay would be suitable.
Day 2. I kneaded the clay by hand, as is usually advised, to remove air.
I shaped a cup from a lump. It was unfamiliar: the clay sticks to your hands if
there is too much water, and it dries out if there is too little.
Result. The walls came out uneven—one side is noticeably thicker than the other. I
didn’t try to fix it; I’ll let it be as it is.
Days 3–7. The cup is drying under loosely stretched plastic wrap, away from the radiator.
Every day, I peek at it to check if any cracks have appeared.
What’s next: in the second week, I’ll check the dryness and refine the shape; in the third, I’ll take it for firing; in the fourth, I’ll try glazing. The timeline depends on the studio.A question for you: what did your first piece look like? Show it in the chat—we’re gathering a collection titled «Crooked, But Mine.»
Zen: Article
Title. Clay Ornament for a Christmas Tree in One Evening
What you will need: self-hardening clay (100–150g), a rolling pin, cookie cutter, a straw or toothpick for making a hole, acrylic paints and a brush, fine-grit sandpaper, ribbon.
How to make it:
- Knead a piece of clay in your hands until it is soft.
- Roll out a sheet about 5 mm thick. To keep it even, place two rulers or strips of equal thickness on either side and roll it with the rolling pin.
- Cut out the shape using the cookie cutter.
- Make a hole for the ribbon using the straw, leaving at least one centimeter from the edge.
- Smooth the edges with a finger slightly dampened with water.
- Let it dry on a flat surface according to the package instructions. Flip it once so the ornament doesn’t warp.
- Once the clay is dry, sand the edges if necessary.
- Paint it with acrylic paints and let them dry. For extra strength, you can apply a coat of varnish.
- Thread the ribbon through. Done!
Important: Products made from self-hardening clay are not intended for food or water, so it is best to store them in a dry place. You can sculpt it in an evening, and it will dry in a couple of days.
Telegram: Photo Carousel
Headline. What to Use Instead of Sculpting Tools at Home
Slide 1 (Cover): Alternatives to Sculpting Tools at Home. Swipe through—you’ll find everything in your kitchen.
Slide 2: Modeling Tools (Sculpting Stick). Substitute: a wooden sushi skewer, a toothpick for fine details, or a plastic card for smoothing.
Slide 3: Clay Cutting Knife. Substitute: thin fishing line or thread stretched between two sticks. This is useful for cutting the clay block into pieces.
Slide 4: Rolling Pin and Guides. Substitute: a flat rolling pin or a clean bottle. To ensure the clay slab is uniform in thickness, place two rulers or slats of the same thickness on either side and roll the pin over them.
Slide 5: Sponge and Board. Sponge: a standard kitchen sponge, without a hard abrasive layer. Board: a smooth cutting board, plastic or wooden. You can also work on a plastic cutting mat.
Slide 6: What Cannot Be Substituted. Clay and glaze for dinnerware: these must be safe for food contact. And the kiln: a home oven is not a substitute—ceramics require a much higher temperature for firing. Look for a studio for firing.
Caption: What do you sculpt with? Write in what home substitute you found, and we’ll compile the best ones in a separate post.